Save to Pinterest
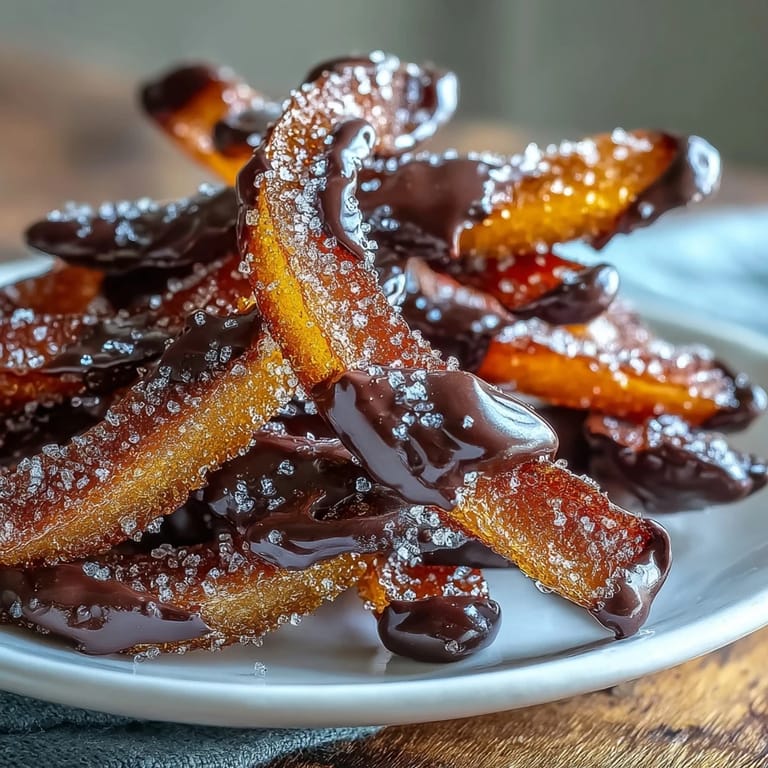
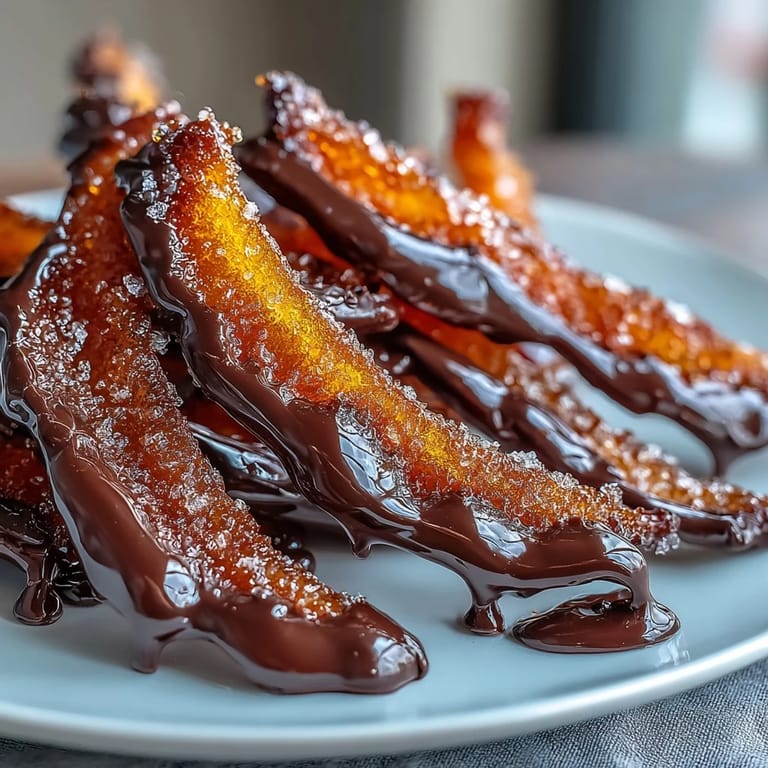
 My kitchen smelled like burnt sugar the first time I attempted candied orange peel, but somehow that mistake led me here—to this version that actually works. There's something about the contrast of bitter pith turning silky-sweet, then meeting that snappy dark chocolate, that makes you understand why the French have been perfecting this for centuries. I've since made them dozens of times, and they never fail to make people pause mid-conversation when they taste one.
I made these for my neighbor last winter after she'd spent weeks helping my kids with their homework, and watching her face light up when she bit into one reminded me that homemade gifts hit different—especially when they're simultaneously bitter, sweet, and a little bit luxurious.
Ingredients
- 4 large organic oranges: The peel is everything here, so choose unblemished fruit and skip the conventional ones to avoid pesticide layers.
- 2 cups granulated sugar: This feeds the syrup that transforms the peel from chewy and bitter to glossy and tender.
- 1 cup water: The syrup base that keeps everything moist during the long, gentle simmer.
- 7 oz high-quality dark chocolate (70% cocoa or higher): Don't cheap out here—the chocolate is half the story, and anything below 70% cocoa will taste waxy against the bright citrus.
- Extra granulated sugar, for coating (optional): A sparkly finish that catches the light and makes these look like tiny jewels.
Tired of Takeout? 🥡
Get 10 meals you can make faster than delivery arrives. Seriously.
One email. No spam. Unsubscribe anytime.
Instructions
- Prep the oranges with intention:
- Wash them under warm water and dry completely—you want no moisture lingering. Using a sharp knife, score the peel into quarters lengthwise, then gently peel away the skin, trying to keep that white pith attached because it's actually the star player here, not the colored part.
- Cut into ribbons:
- Slice each peel lengthwise into strips about 1/4-inch wide, like you're creating tiny edible necklaces. Consistency matters because thin strips cook faster and look more refined.
- Blanch away the bitterness:
- Place all your strips in a saucepan, cover with cold water, bring to a rolling boil, then drain completely. Repeat this exact process two more times—yes, three total—and you'll watch the water go from cloudy to clearer each time. This is the secret that separates homemade from that slightly astringent store-bought version.
- Build the syrup:
- In a clean saucepan (don't reuse the blanching one), combine the 2 cups sugar and 1 cup water over medium heat. Stir gently until the sugar disappears and the liquid becomes crystal clear, then lower the heat just slightly.
- Simmer the peels into submission:
- Add your blanched peels to the syrup and let them bubble ever so softly for 45 to 60 minutes, stirring every 10 minutes or so. You're watching for the moment they turn translucent—that's when the magic happens, when they go from chewy to silky. If the syrup starts to turn golden or amber, your heat is too high, so back off immediately.
- Transfer to the drying rack:
- Using tongs or a slotted spoon (not your fingers, trust me), lift each peel carefully onto a wire rack that's sitting over parchment paper. Let them sit undisturbed for at least an hour until they feel dry to the touch but still slightly tacky—they shouldn't be crispy.
- Optional sparkle coat:
- If you want them to look extra fancy, toss them gently in a bowl of extra granulated sugar while they're still barely sticky. The sugar clings like frost and catches light beautifully.
- Melt the chocolate carefully:
- Fill a saucepan with a couple inches of water and bring it to the barest simmer, then set a heatproof bowl on top (it shouldn't touch the water). Break the dark chocolate into pieces and stir it constantly until it's smooth and glossy, about 3 to 4 minutes. Overheating chocolate makes it seize and become grainy, so patience is your friend here.
- Dip with finesse:
- Hold each candied peel by the uncoated end and dip it halfway into the warm chocolate, letting any excess drip off for a second before setting it chocolate-side-up on fresh parchment paper. Work quickly but gently because chocolate sets fast once it touches cooler air.
- Let them set:
- Leave them at room temperature for 30 minutes, or speed things up with 10 minutes in the refrigerator. They're ready when the chocolate snaps slightly if you bend a piece.
 Save to Pinterest
 A friend who normally doesn't eat sweets sat in my kitchen and had three of these in a row, and that's when I knew I'd finally nailed it. There's something about that exact moment when texture meets flavor that transcends "just a confection."
The Blanching Step Explained
The blanching might feel tedious, but each time you boil and drain, you're removing bitter compounds from the peel without stripping away the delicate structure. I learned this the hard way when I skipped the second blanch to save time and ended up with something that tasted like medicinal cough drops. Now I embrace those three boils as the foundation of everything that comes after.
Storage and Shelf Life
Once the chocolate has set completely, store these in an airtight container at room temperature, and they'll stay fresh and snappy for up to two weeks—though honestly, they rarely last that long in my house. If you live somewhere humid, toss a small silica gel packet in the container to keep them from absorbing moisture. They don't need the fridge unless your kitchen is genuinely warm.
Flavor Variations Worth Trying
Once you master the basic version, this recipe becomes a playground for experimentation. I've added cinnamon sticks and cloves to the syrup (remove them before drying), swapped in blood oranges for a deeper color, and even tried a whisper of cardamom. The framework stays the same, but the possibilities shift with the seasons and your mood.
- Add a cinnamon stick or two cloves to the syrup while simmering if you want warm spice notes competing with the citrus brightness.
- Try dipping half in dark chocolate and half in white or milk chocolate for a dramatic two-tone look that tastes like a flavor conversation.
- Make these in batches and freeze the undipped peels in an airtight container for up to three months, then dip and serve whenever the mood strikes.
 Save to Pinterest
 Making these feels like you're doing something impossibly French and fancy, but really you're just being patient and kind to a humble orange peel. That's the whole story.
Recipe Questions
- → How do I reduce bitterness in orange peel?
Blanch the orange peel strips by boiling them three times in fresh water to remove bitterness before candying.
- → What is the best type of chocolate for coating?
Use high-quality dark chocolate, preferably 70% cocoa or higher, for a rich and balanced flavor.
- → How long should the peels dry before dipping?
Allow the candied peels to dry for at least 1 hour until they feel no longer sticky to ensure proper chocolate adhesion.
- → Can I add spices to the syrup for extra flavor?
Yes, adding a cinnamon stick or a few cloves while simmering enhances the syrup’s aroma, but be sure to remove them before drying.
- → How should the finished confections be stored?
Store in an airtight container at room temperature for up to two weeks to maintain freshness and texture.