 Save to Pinterest
 I'll never forget the first time I built this log cabin appetizer at my sister's engagement party. I was standing in her kitchen, surrounded by bowls of cheese and stacks of pretzel rods, when she walked in and laughed—"Are you building a house in here?" By the time I'd stacked the third layer, guests started gathering around the platter, mesmerized by this edible architecture. It became the star of the snack table, and honestly, it was so much fun to create that I've made it for nearly every gathering since.
What really sealed the deal for me was watching my nephew's face light up when he realized the cabin was actually edible. He'd been treating it like an art installation, and the moment he understood he could eat it, he was all in. That's when I knew this recipe had something special—it bridges the gap between food and play in a way that brings people together.
Ingredients
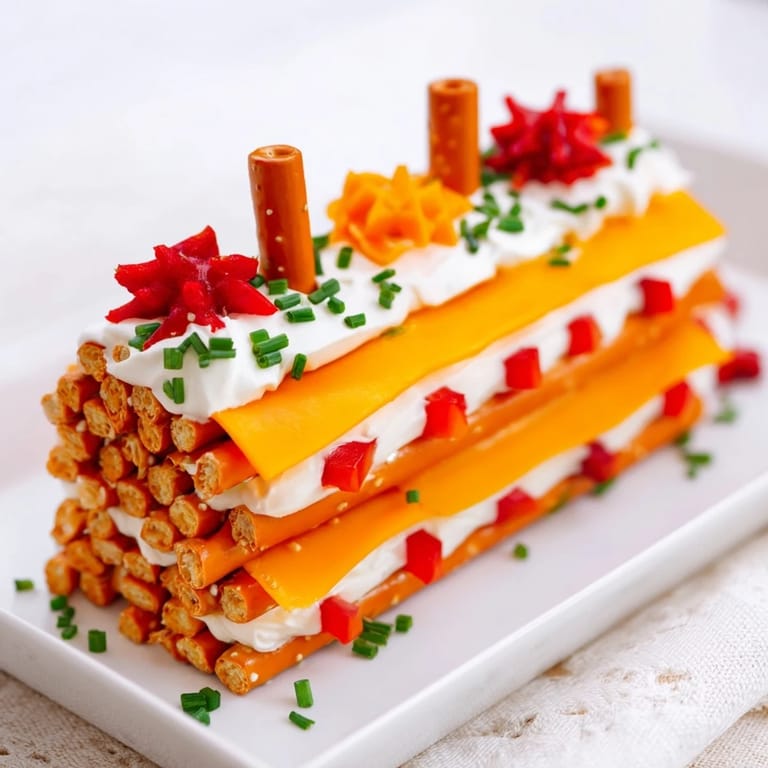
- 24 large pretzel rods: These are your structural backbone, and their salty crunch is non-negotiable. I learned to choose the straightest ones for easier stacking, and honestly, the slight imperfections in shape actually add to the rustic charm.
- 10 oz sharp cheddar cheese, cut into long slices (4–5 inches long, ½ inch thick): Sharp cheddar brings a bold flavor that stands up to the salt of the pretzels. Cut them as evenly as you can—uniform slices make stacking so much easier and look intentional rather than haphazard.
- 8 oz mozzarella cheese, cut into similar long slices: Mozzarella adds a milder, creamier contrast to the sharp cheddar. The combination of both gives you depth and prevents any single flavor from dominating.
- ½ cup whipped cream cheese or soft cheese spread: This is your mortar, your glue, your secret weapon. A small dollop between layers keeps everything stable and adds richness to every bite.
- 2 tbsp chopped fresh chives or parsley: These aren't just decoration—they bring a fresh, grassy note that brightens all that cheese and pretzel saltiness. I always chop mine right before serving to keep the color vibrant.
- 1 small red bell pepper, diced: Save this for creating details like a chimney or charming windows. The sweetness and slight crunch add a delightful surprise element.
- Crackers, for serving: Choose something sturdy enough to support the weight of cheese and pretzel without shattering. I prefer something neutral so it doesn't compete with the cabin itself.
Tired of Takeout? 🥡
Get 10 meals you can make faster than delivery arrives. Seriously.
One email. No spam. Unsubscribe anytime.
Instructions
- Prep your materials like you're gathering building supplies:
- Lay out your cutting board and sharp knife, then methodically slice both cheeses into long, even planks. This is where precision pays off—uniform slices mean stable stacking. Take a moment to arrange your ingredients in front of you, almost like you're visualizing the cabin before you build it.
- Choose your foundation:
- Select a large, sturdy serving board or platter—something with enough space for a 6 by 4 inch base. This is like choosing the right plot of land for your cabin.
- Lay the first frame:
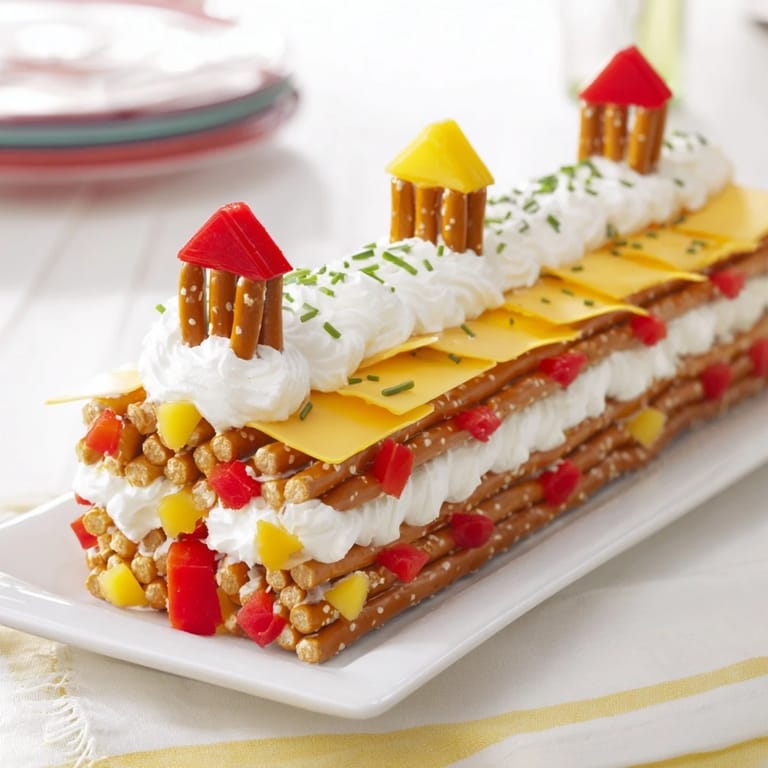
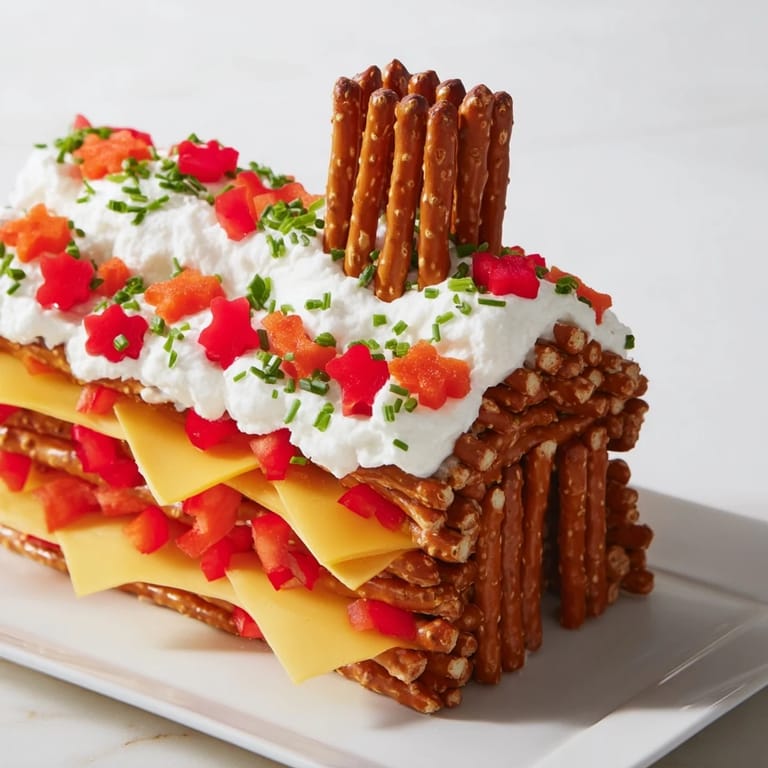
- Arrange pretzel rods in a rectangle shape on your board, using about 6 rods to create an open rectangular outline roughly 6 by 4 inches. Stand them upright like fence posts, leaving an open center where your layers will go.
- Begin stacking with the first layer:
- Inside that pretzel frame, lay down a line of cheddar slices, then top with a line of mozzarella. Picture yourself laying logs—they should run the length of the cabin. Add a tiny dollop of cream cheese between layers if things feel wobbly.
- Continue building upward:
- Add another frame of pretzel rods around the cheese layer, then repeat with cheese. Alternate between pretzels and cheese, creating that classic log-cabin pattern. This is where you really feel like you're building something real. Keep checking your angles—a slight tilt gives it character, but too much and it's an accident waiting to happen.
- Build to your desired height:
- Stack until you've reached 4 to 5 layers high. Finish with a cheese layer on top—it looks more intentional and creates a stable surface for your roof or final details.
- Add the roof and architectural details:
- Lean cheese slices against the top at angles to create a peaked roof, or arrange them flat for a more modern cabin. Use diced red bell pepper to create a chimney, windows, or a front door. This is where it stops being just food and becomes art.
- Garnish and finish:
- Sprinkle your chopped chives or parsley across the whole structure, letting it settle into the crevices. This brings life and color to your creation and hints at the fresh flavors waiting inside.
- Surround and serve:
- Arrange crackers on the board around your cabin, creating a little scene. Step back, admire your work, and wait for the reactions.
 Save to Pinterest
 There was this beautiful moment at a dinner party when someone carefully deconstructed one side of the cabin to get at a piece of cheese, and instead of feeling ruined, it somehow made the whole thing more inviting—like a real cabin you could actually live in and use, not just admire from a distance. That's when I understood this recipe's real magic: it makes food feel interactive and joyful.
Making It Your Own
One of my favorite discoveries was experimenting with different cheese varieties. Smoked cheddar adds a campfire-like depth that feels thematic, and pepper jack brings a gentle heat that surprises people in the best way. I've also swapped in aged gouda for elegance or mixed in a creamy brie layer for unexpected richness. The structure stays the same, but the flavor story changes completely.
Gluten-Free & Dietary Adaptations
If you're accommodating gluten-free guests, certified gluten-free pretzel rods work beautifully—the structure holds just as well, and honestly, most people won't notice the difference. The whole appetizer is naturally vegetarian, and dairy-free versions are possible if you use cashew-based cheese alternatives, though the architecture becomes slightly more delicate.
Timing & Make-Ahead Strategy
The magic of this recipe is that you can prep everything hours ahead and assemble just before serving. I always cut my cheeses in the morning, store them in airtight containers, and build the cabin about 30 minutes before guests arrive—just enough time for it to feel fresh while giving you breathing room to handle other party details.
- Pre-cut both cheeses and store separately so they don't stick together.
- Assemble no more than 45 minutes before serving to keep everything looking crisp and fresh.
- If your cabin starts to lean, a gentle dollop of cream cheese on the wobbly side usually fixes it.
 Save to Pinterest
 This recipe has taught me that sometimes the most memorable food moments aren't about complexity or technique—they're about creating something that makes people smile before they even taste it. Serve this with confidence and watch it become the conversation starter at your table.
Recipe Questions
- → What cheeses work best for the layering?
Sharp cheddar and mozzarella are ideal for their firm texture and complementary flavors, allowing neat slices that stack like logs.
- → Can this be made gluten-free?
Yes, substitute regular pretzel rods with certified gluten-free versions without altering taste or structure.
- → How do I keep the layers together?
Use whipped cream cheese or a soft cheese spread as a binding mortar to hold pretzels and cheese slices securely.
- → What decorative elements enhance the appearance?
Diced red bell pepper pieces create chimney or flower details, while fresh chopped herbs like chives or parsley add a rustic touch.
- → Can I prepare this in advance?
It’s best assembled shortly before serving to maintain pretzels’ crunch, but cheese slices and garnishes can be prepped earlier.
- → What’s a good serving suggestion?
Serve with crackers on the side to complement the salty pretzels and rich cheese layers for a balanced snack experience.